Have these venerable meters revitalized after a dormant period
and use them with confidence in the field...
Is it possible to replace cells in these elder meters?
It could be done when there were cells available. The ones that are available for the Sekonic Studio series are too large so they won't fit. To make them fit is not an easy task and you could easily ruin the cell.
We did investigate the possibilities if these cells can be made nowadays and here is the good news:
The cells are available.but not for very long!
The bad news is, production will be limited. If you plan to replace cells order your supplies now as per March 30 2004 production will cease for ever!!!
The End of an era, pity....
It would be nice to get some insight how many people would want to resuscitate those machines.
Prices can be made but we have to order numbers!
If you are interested let us know here
|
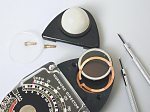
 Director series: including M2 and Super Director.
Move your mouse over the image to see a larger one...
The top of the meter has to be opened, by removing the lacquer covering the screws. Look for the right tools as the screws can differ from Phillips, torx to slotted screws.
The Directors used Philips #0. Tip: Be sure all lacquer has been removed before attempting to unscrew!!!
After unfastening the screws take off the upper part, watch out for the glass protection disk as this can break if it falls down.
The later series had plastic disks.
Carefully lift the upper part of the brass contact ring and remove the cell.
Reverse the procedure after installing the new cell.
The cell we're looking for must have a diameter of 29mm, no leads and a closed circle as contact stripe.
:::::: Placing the Cell ::::::
The photograph will show it is really a jiffy to replace the cells, just slide it in!
Calibration is another thing we will explain after we replaced our first cells.

 See report ! See report !
|
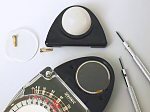
 Type S series:
Move your mouse over the image to see a larger one...
The top of the meter has to be opened, by removing the lacquer covering the screws. Look for the right tools as the screws can differ from torq to a normal screw.
After unfastening the screws take off the upper part.
Remove the plastic disk and lift the cell carefully. Desolder the leads. The black thread must be resoldered on the side where the contact stripe begins.
The red lead should be soldered at the center of the bottom.(Use soldering iron Max 30Watt)
Note: The cell we supply has the leads soldered on already, just solder them to the threads from the meter!
This cell has a diameter of 29mm and a broken circle as contact stripe. and one center contact point.(comes with leads fitted)
:::::: Placing the Cell ::::::
The photograph will show it is a little more difficult, you have to solder the leads
Calibration is another thing we will explain after we replaced our first cells.
|
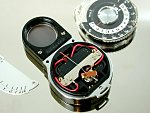
 SUPER DIRECTOR
Move your mouse over the image to see a larger one...
This remarkable meter can be revised also...
Same procedure as the Norwood Director and the Brockway M2. No soldering leads just get the top off the swivel and change the cells.
Occasionally it can happen that the meter does not work i.e the needle is still dead. The problem is often found in corroded leads inside the meter.
If you're unlucky you have to dig deeper..!
Before you start the operation it is wise to check if the needle is moving with the old cell and then decide to change cells.
To open the body of this meter is not difficult but it has its own caveats.
|
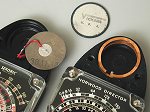
 Both Cells:
Move your mouse over the image to see a larger one...
Clearly seen here is the big difference in cell mounting.
The Director series seem the easiest way to do..No leads, just replace and calibrate!
Actually I did dismantle them, but till now I can only replace the faulty cell and it worked fine.
We can offer the cells for the Director series and the Studio-S series. Also available is is the WestonMaster cell.
:::::: Soldering the leads ::::::

 See report ! See report !
|
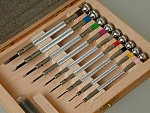
 Tip:What do you need?
Move your mouse over the image to see a larger one...
Before you start dismantling your meter make sure you have the proper tools.
#1 This would do, a precision set from Micro-tools. ( Screwdrivers range from 0.60 - 3.00mm.)You will find them here.
#2 Soldering iron MAX 30 Watt
#3 Phillips #0 - or slotted screwdrivers (Depends on Model)
#4 Lacquer paint to cover the holes after assembly
More Products from Micro-tools
|
 |
|
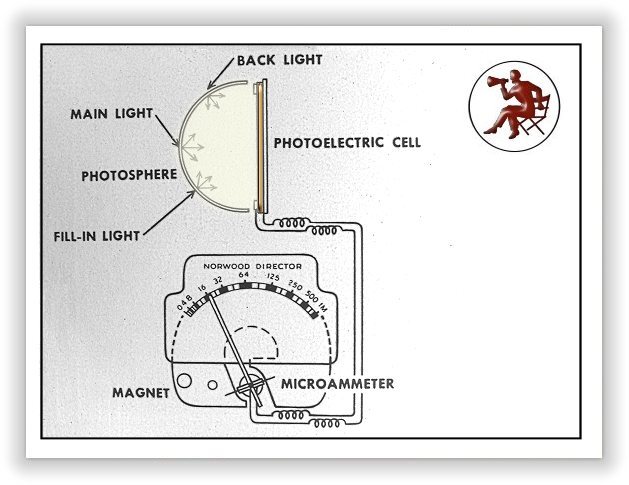
:::::: The Principle ::::::
The working principle of an exposure meter is simple. Light entering the meter touches a photo-electric cell. This cell generates a tiny electric current. An ammeter reads the current and the meter movement swings an indicator along a calibrated scale. The reading is translated into exposure data by direct mechanical means or by transferring the reading to a calculator on the meter.
|

:::::: Resuscitation ::::::
NorWood Director Type C NR:30190 (1950)
Date: 6-9-2003.Report from the author:
As per instructions above carried out the replacement of the cell (B-29)
Cleaning the inside and the protective glass cover. Checking out the pressure of the contact rings. Reassembling the meter. Zero correction adjusted!
Checking under miscellaneous light conditions against a Sekonic L-398.
Calibration: No need.
Discrepancies if any: Not Found!
Conclusion: Meter is dead-on and ready to go!!
To be sure I did another one NorWood Director type C NR:48753 ...
Discrepancies if any: Not Found! Meter responded 100% against my L-398.
Both Meters are 100% functional again..!
 Order CELL Order CELL
|


:::::: Resuscitation ::::::
Sekonic Studio Type S NR:315080 (1957)
Date: 6-9-2003.Report from the author:Here we go..A right in your face, get your hands dirty job :-)
As per instructions above carried out the replacement of the cell (B-29 with leads)
This type of meter is a little more difficult, because you need to desolder, clean the contacts and resolder again!
Very important again is to use the proper tools. The soldering iron should not become too hot!(Max 25-30Watt)
You need good eyes or a loupe to see you that you apply minimal tin. After soldering the leads, you have to insulate the black lead contacts to prevent shorting.
(You could try silicon gel)
The red lead is not necessary as it has to make contact with the bottom part anyhow.
Carefully place the cell back in its position not forgetting the metal spring clip (Must be placed underneath the cell.)
Clean the glass protection cover and replace it on top of the cell, next reassemble the top housing and secure the screws.
Testing:
Checking under miscellaneous light conditions against a Sekonic L-398.
Calibration: No need.
Discrepancies if any: Not Found!
Conclusion: Meter is dead-on
Finally some cosmetics...apply lacquer paint to cover the holes of the screws....
Happy metering and remember:
You could be the light meter wizard on the block with your own resuscitated Director!
 Order CELL Look for B-29 with leads!! Order CELL Look for B-29 with leads!!
|

Selenium Cells Special order:
| Cell | Type | Diameter | Leads | Type Meter | Price | Order |
 | B29 | 29mm | NO LEADS | Directors Models B-D
Brockway Models M2-M3
Super Director | EURO 27.50 |  |
 | B29 | 29mm | LEADS | Brockway Studio-S
Sekonic Studio-S series | EURO 32.50 |  |
 | B45 | 45mm | NO LEADS | Weston Master I-V
Weston Euro Master
Partslist | EURO 45.00 |  |
|
Note:
Production will stop towards the end of March 2004 after this date Selenium cells are not longer produced.
Prices do not include VAT and Shipment!
Shipment Priority Europe : EURO 1.77
Shipment Priority elsewhere: EURO 2.25
|
|
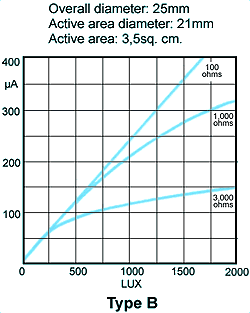
Sensitivity
The average current into a low load resistance is given in the
table. The active area of the cell comes to about 3mm from the
edge - the diameter of the active area is thus about 6mm less
than that of the cell:
|
|
Photocell
Characteristics Current-illuminance Diagram


Mail me now




 Tip:What do you need?


